
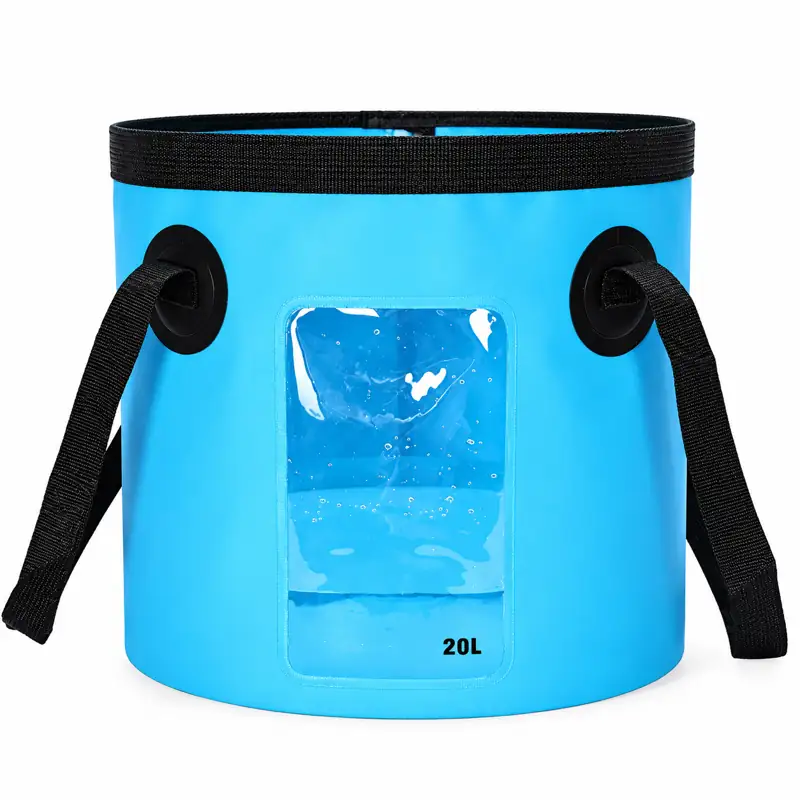
The short answer
For custom fishing buckets with clear windows, provide a panel map showing the viewing area, artwork, body orientation and any nearby seams or folds. Review visibility and branding on the selected sample in both opened and packed states. Keep the window material, decoration method and any required durability evaluation as separate approvals. The useful output is a window-and-artwork map tied to the exact model, with observations made under stated viewing conditions.
Define what the buyer needs to see
A clear area is useful only when its location and viewing purpose are understood. Start by identifying what the customer expects to view and from which position. A window that looks prominent on an empty display photograph may be partly hidden by the selected contents, a handle or the way the body is placed in use.
For custom fishing buckets, draw the intended viewing zone on the actual model outline. Include the orientation of the opening, handles and other fixed features. State which areas should remain clear and which can carry graphics. This gives the supplier a practical brief without assuming that a particular clear film or print process is already approved.
Compare the clear-window reference and the clear-grid reference in the bucket collection. Their visible panel arrangements help the discussion; the selected configuration still needs a model-specific artwork map.
Map windows and artwork on the same drawing
Use one drawing revision to show the viewing zone and proposed decoration. Locate artwork from repeatable features such as a panel edge or a defined seam reference. Identify the orientation used when dimensions are read. A logo position described as “front centre” is not repeatable if the front has not been defined.
| Map field | Buyer instruction | Sample review |
|---|---|---|
| Viewing zone | Mark the area intended to remain visibly clear | Observe the agreed contents from the named position |
| Artwork footprint | Provide dimensions, orientation and a placement reference | Check the printed area against the accepted drawing |
| Nearby construction | Show seams, folds, handles and edge components | Review interference in opened and packed states |
| Variant identity | List the model, body finish and artwork version | Confirm that the sample uses the intended combination |
Keep artwork files separate from a perspective rendering. A rendering can communicate the visual idea, while the placement drawing controls the dimensions and location to be reviewed.
Approve the selected surface and decoration method
Ask the supplier to identify the proposed window material and the surface on which decoration will be applied. The name of a clear material does not settle the compatible process, appearance or finished construction. Request the proposed method and a sample on the selected surface before accepting the artwork for production.
Look at the printed result alongside the viewing zone. Record whether the approved artwork is intended to appear opaque, translucent or simply remain outside the clear area. These are visual requirements to agree, not properties to infer from a digital mock-up. If a material or finish changes, identify whether artwork appearance or the available decoration area needs a new review.
View the sample in the states the buyer will encounter
Record the contents and body arrangement used for a visibility review. Keep the viewing position and lighting description with the observations so that a later reviewer understands the comparison. The aim is a reproducible visual decision, not an unqualified statement that every object will be visible from every angle.
Then follow the proposed folding and packing sequence. Note where the window and printed panel sit relative to folds and other components. Ask for the care and storage guidance applicable to the selected construction, and identify any evaluation required for the intended use. Do not claim a particular abrasion life, clarity retention or chemical resistance without relevant evidence for that configuration.
Illustrative brief: a visible contents zone and a branded panel
A hypothetical wholesale buyer wants customers to recognise a defined equipment set through a clear panel while keeping the brand graphic readable on the same bucket. The brief includes an opened outline, a named viewing side and an artwork file with its placement dimensions. The model's folded state is shown in a separate drawing.
The sample review first checks the window against the intended contents, then checks the artwork in the agreed orientation. Reviewers record any overlap or obstruction instead of moving the logo informally on a photograph. A revised window size or graphic position receives a new map revision. No actual order or test result is implied by this example; it illustrates the information a buyer should provide for a comparable proposal.
Retain a window-and-artwork approval map
The purchasing attachment should include the model identity, panel drawing, viewing requirement, artwork version and sample observations. Separate an accepted visual result from an unresolved material or durability question. If several colors or finishes are ordered, identify which combination was reviewed rather than assuming one sample represents every SKU.
The logo approval guide supports artwork version control, while the sample approval process supports the completed configuration. Keep this map with both records. On a reorder, a change to the panel, finish, print method or fold arrangement should be reviewed against the original viewing purpose and branding requirement.
Discuss the selected model and purchasing brief
Send the model references, quantity split and the decision record described in this guide. Add your artwork, packing requirements, destination and required delivery date.
Request a project quotationEmail michael@outdoorsbloom.com or denggaoz@gmail.com.